


The Best Vacuum Insulated Water Bottle Manufacture!
Borge drinkware was founded in 2015. In past 2 years,we achieved many great developments, like vacuum furnace, dust-free workshops and so on. Today, we have more than 150 workers and OEM for some famous brands. In 2018, we built a new effective Quality Management System and foreign trade team in order to bring our products and company to a higher stage.
why choose us
Our Products
We offer a variety of high-quality items, including stainless steel vacuum flasks, thermos food jars, stainless steel sports water bottles, plastic water bottles, glass water bottles, coffee pots, wine tumblers, coffee mugs, and silicone foldable water bottles.
Product Application
Our products provide unique solutions for keeping food and beverages hot, cold, and fresh. With these items, consumers can enjoy their favorite drinks and meals at home, work, or while on the go.
Certifications
Our products are certified for safety and quality. We hold FDA, LFGB, CE, and SGS certifications, and all items are BPA-free.
Production Market
We export our products to various regions, including North America, Europe, South Korea, Japan, Southeast Asia, Oceania, and South America. We have built a strong reputation in these markets.


A vacuum flask is an insulating storage vessel that slows the speed at which its contents change in temperature. It greatly lengthens the time over which its contents remain hotter or cooler than the flask's surroundings by trying to be as adiabatic as possible.
Benefits of Vacuum Insulated Water Bottle
Reduced exposure to harmful chemicals - Disposable plastic water bottles can leach chemicals like bisphenol A (BPA) and phthalates into the liquid over time. This can pose health risks. Insulated bottles are made of inert materials that don't leach chemicals.
Improved taste
Insulated bottles help maintain the temperature of liquids longer. This leads to a better tasting beverage compared to room temperature water in plastic bottles which can take on a plastic flavor.
Eco-friendly
Reusable insulated bottles reduce plastic waste and your carbon footprint. Single-use bottles require energy and resources to produce and often end up as pollution. An insulated bottle lasts for years.
Convenience
Insulated bottles are portable, durable, and versatile. Take them anywhere while keeping drinks cold up to 24 hours or hot up to 12 hours. Most are lightweight, shatterproof, and easy to clean.
Cost savings
Buying an insulated bottle is cheaper long term than purchasing endless cases of disposable plastic water bottles. There are many affordable, high-quality insulated bottle options on the market.
Understanding How Heat Is Transferred Through Conduction and Convection
To understand how vacuum insulated bottles work, it’s important to know what causes the temperature of liquids to change: Conduction and convection.
Conduction is one form of heat transfer that occurs when two objects are in direct contact. When this happens, heat is transferred from the areas that have more kinetic energy (hotter area) to those with less (colder area).when a pot of water is placed on a stove and the stove is turned on, the pan becomes increasingly hotter due to conduction (that’s where the metal of the pot is directly in contact with the heating element).
Convection is another form of heat transfer that takes place in liquids and gases through the movement of molecules. Similar to conduction, molecules move from hot areas to cooler areas. Take the previous scenario for example. While the pot is heated by conduction, the water inside the pot is heated by convection. As the water at the bottom of the pot (touching the hot metal) rises, it transfers heat to the water above it. The cold water at the top then sinks towards the bottom of the pot. This process continues until all the molecules reach a constant temperature.
Double Wall Insulation Prevents Heat Transfer
With water bottles, conduction occurs from the moment you hold them. The heat from your hands transfer to the bottle and to the water inside. Convection takes place once a temperature difference is present in its contents. In other words, when your cold water is exposed to heat, the water warms up.
Reusable water bottles with double-wall insulation are made of two steel walls separated by a vacuum. These components act as a barrier to prevent the heat transfer that takes place through conduction and convection. A well-made insulated water bottle also comes with a lid that not only prevents leaking but also serves as an effective seal to prevent convection from affecting the temperature of the liquids in your bottle.
Double-wall vacuum insulation and a leak-proof lid prevents heat transfer and keeps your beverages at a constant temperature, which makes it less likely for convection to take place.the liquid stored in a vacuum insulated water bottle remains at the same temperature for longer periods of time than regular reusable bottles.
Size: Consider the size of the bottle you need. If you want a bottle for everyday use, a smaller size may be more convenient. But if you want to use it for outdoor activities like camping or hiking, a larger size may be more suitable.
Material:These are made of different materials like stainless steel, glass, and plastic. Stainless steel is durable and easy to clean, while glass is eco-friendly and does not retain any flavors. Plastic is lightweight and affordable, but it may not be as durable as other materials.
Insulation: The quality of insulation is crucial when choosing a vacuum bottle. Look for bottles that have double-walled insulation, as this can keep your drink hot or cold for a longer period of time.
Lid type: The type of lid you choose is also important. Some bottles come with a screw-on lid, while others have a flip-top lid or a straw. Choose a lid that is easy to open and close and does not leak.
Brand: Finally, consider the brand of the insulated bottle. Choose a reputable brand that has a good reputation for producing high-quality bottles.

How to Clean a Stainless Steel Vacuum Insulated Water Bottle
Use hands
Most stainless steel vacuum insulated bottles are not dishwasher safe. Therefore, it is recommended to wash the bottle by hand using warm soapy water. Use a soft-bristled brush or sponge to clean the bottle and its cap.
01
Use a bottle brush
If your bottle has a narrow mouth, a bottle brush can be helpful in cleaning the interior of the bottle. Be sure to use a brush with soft bristles to avoid scratching the surface of the bottle.
02
Rinse thoroughly
After washing the bottle, rinse it thoroughly with clean water to remove all traces of soap. You can also rinse the bottle with vinegar or lemon juice to remove any stubborn stains or odors.
03
Dry completely
Allow the bottle to air dry completely before storing it. You can place the bottle upside down on a dish rack or towel to speed up the drying process.
04
Store it properly
To keep your stainless steel vacuum insulated water bottle in good condition, store it in a cool and dry place. Avoid storing the bottle with the cap on to prevent moisture buildup, which can lead to odor and mold.
05
For What Different Purposes Do You Use A Thermos Flask
Thermos flasks are a great way to enjoy hot beverages no matter where you are. With advanced insulation technology, Nanobot thermos flasks offer unbeatable thermal performance compared to other containers. The vacuum sealed lid provides an additional layer of heat retention for drinks that stay hot for 24 hours!
In addition to keeping things hot, Thermos flasks can also be used to keep things cold. This can be useful for bringing along a chilled drink on a hot day. It can keep your drink cold for 24 hours.
Thermos flasks are invaluable when it comes to everyday convenience and portability. Whether you’re heading off to work every morning with a hot cup of coffee or enjoyed a refreshing drink on an outdoor excursion, the thermos ensures that your liquids remain at the exact temperature for hours on end.
Thermos flasks are not only used to keep hot and cold drinks at their ideal temperature, but they can also be utilized to store food such as soup. It is a convenient way to keep your meal warmer or cooler when needed. The double-walled insulation helps prevent the exterior from becoming too hot, making it safe to carry around in any bag without having to worry about messes or spills.
If you have a baby or toddler who is still eating pureed foods, a thermos flask can be handy for packing their food when traveling or going out for the day. This is especially useful if you’ll be away from home for more than a couple of hours and don’t want their food to spoil.
The Significance of Vacuum Insulated Bottle
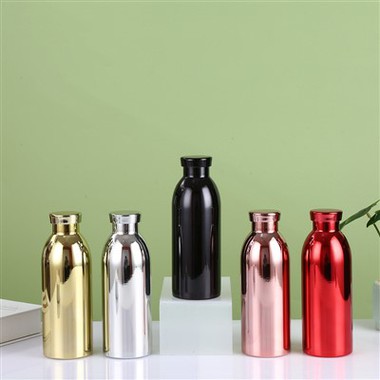
Insulated flasks are available in a variety of beautiful designs.
Who wants to carry dull transparent plastic bottles when users can get some designs on them to make them more visually appealing? Insulated water bottles are ideal for people who want to stay on trend or simply want to make their flask a part of their Influencer life! You can explore the multiple trending designs by Nanobot and even register for custom bottles as per your choice and convenience.
Insulated Vacuum Flasks are non-toxic
Since the 1960s, the toxic chemical bisphenol A (BPA) has been employed to make a variety of plastic products. Since the risks of BPAs became widely known, water bottle manufacturers have shifted away from BPA-containing plastics and toward other materials such as glass and steel. Vacuum insulated water bottles manufactured of 18/8 food-grade stainless steel offer the best combination of toxicity-free construction as well as durability.
No sweating concern
Because of the vacuum insulated innovation, condensation does not establish inside the tumbler. The outside remains dry also when filled with ice. We’re concerned about this because we don’t want our bottle to leave watermarks on our computers or tablets. If we choose to freeze the tumbler or bottle, the double-wall insulation component is also critical in preventing the exterior of the bottle from becoming cold.
Keeping your drinks hot and cold for 24 Hours
A “vacuum-sealed” stainless steel bottle has two layers: One on the inside and another one on the outside. There is also an insulation layer between the 2 airtight sealed layers. Heat is transmitted through conduction by colliding molecules. A vacuum, on the contrary hand, is nothing more than empty space. It is either devoid of molecules or contains a small number of them.
How to Make a DIY Vacuum-Insulated Water Bottle


Step 1: Cutting the Steel
Measure the Tubes: Use a measuring tape to accurately measure and mark the length of both the inner and outer stainless steel tubes. Precise measurements are crucial!
Secure the Tubes: Place each stainless steel tube into a pipe cutter, aligning the cutting wheel with the marked length. Tighten the cutter slightly to hold the tube firmly in place.
Cutting: Rotate the pipe cutter around the tube, applying steady pressure. After each full rotation, tighten the cutter incrementally. Continue this process until the tubes are completely cut through. This ensures clean and even cuts, which are essential for the later assembly steps.
Deburring: Once the tubes are cut, use a deburring tool or fine-grit sandpaper to smooth the edges. Deburring is necessary to remove any sharp edges or burrs, making the tubes safer to handle and ensuring a snug fit during assembly.
Step 2: Shaping the Tubes
Insert the Tubes: Place the cut stainless steel tubes into the water expansion machine, ensuring they are properly aligned with the molds. Proper alignment is crucial to prevent deformation during the shaping process.
Apply Water Pressure: Activate the machine and fill the tubes with water at high pressure. The high-pressure water causes the tubes to expand and conform to the molds' shapes. This method ensures that the tubes form seamless, uniform bottles with the appropriate size difference for the inner and outer tubes.
Step 3: Creating the Bottom
Measure and Cut: Measure the diameter of the bottom openings of both the inner and outer cylinders. Use a metal cutting shear to cut round pieces from the stainless steel sheet that match these diameters precisely. The inner cylinder's bottom piece should be slightly smaller than the outer cylinder's bottom piece.
Prepare for Welding: Clean the bottom edges of the inner bottle and the cut piece with rubbing alcohol to remove any grease or contaminants. This step ensures a strong and clean weld.
Weld the Bottom: Position the cut piece at the bottom of the inner bottle. Use a TIG welding torch to weld the piece to the bottom, ensuring a continuous, smooth weld without gaps or weak points. The outer bottle's cylinder will be left off until the two bottles have been welded together.
Step 4: Threading the Neck and Creating the Lid
Threading the Cylinder: Transfer the outer bottle to the threading machine. Ensure correct positioning to achieve accurate and consistent threads. Set the machine to the desired thread pitch and depth according to ISO metric standards. Cut the threads smoothly and consistently, inspecting for defects using gauges.
★Creating the Lid:
Note: If you have access to a 3D printer, this step can be ignored—simply 3D print a lid for the bottle based on the diameter and threading.
Cut and Shape Plastic: Cut the polypropylene into a cylinder slightly larger and taller than the neck of your bottle. Then, drill a hole into the cylinder at the same depth and width as the neck, accounting for the threading.
Thread the Lid: Use a threading machine to create threads on the hole in the plastic cylinder. Ensure they match the thread pitch and depth of the bottle's mouth for a secure fit. This step is vital for ensuring the lid screws on tightly, preventing leaks.
Assemble the Lid: Press-fit additional components, such as silicone seals, to enhance the lid's functionality. These components can help maintain the bottle's insulation and ensure a leak-proof design.
Step 5: Cleaning and Polishing
Wipe Down: Clean the surface of the tumbler with a cloth soaked in rubbing alcohol or acetone. This step removes any grease, dirt, or contaminants that might affect the polishing process.
Set Up Electrolysis Bath: Prepare an electrolysis bath with a food-safe electrolyte solution. This setup includes a container filled with the electrolyte solution and a power supply to create an electric current.
Submerge Parts: Submerge the stainless steel parts of the bottle in the electrolysis bath. Ensure that the parts are fully immersed and properly positioned.
Apply Current: Connect the tumbler to the power supply and pass an electric current through the solution for 30 minutes to an hour. This process removes a thin layer of metal, smoothing and polishing the surface to a mirror-like finish. It also ensures that all surfaces are food-safe.
Step 6: Assembly and Welding
Insert Inner Cylinder: Insert the inner cylinder into the outer cylinder from the bottom, ensuring it is centered with a uniform gap between the two. This gap is crucial for creating the vacuum insulation later.
Weld the Mouth: Position the mouth of the inner cylinder to align with the outer cylinder's neck. Use a TIG welding torch to weld the mouth of the inner cylinder to the outer cylinder's neck. Ensure the weld is smooth and continuous, creating a strong seal between the two cylinders.
Step 7: Creating the Vacuum
Create a Hole: Drill a small hole in the bottom of the outer cylinder. This hole will be used to evacuate the air from the space between the inner and outer cylinders, creating the necessary vacuum for insulation.
Place in Vacuum Chamber: Ensure the vacuum chamber is clean and properly set up for the process. Place the assembled bottle upside down in the vacuum chamber, with the drilled hole facing up. Cover the hole with a piece of solder. This setup allows the chamber to evacuate the air and seal the hole with the solder.
Activate Vacuum and Heating: Activate the vacuum chamber to evacuate air from the space between the cylinders through the drilled hole. Monitor the pressure gauges to ensure a complete vacuum is achieved.
Heat the Solder: Once the vacuum is achieved, heat the chamber to 500 degrees Fahrenheit, melting the solder and sealing the hole. This process ensures that the vacuum layer is sealed properly.
Step 8: Insulation Testing
Heat the Interior: Use a heat gun (or blow dryer) to blow hot air inside the tumbler, ensuring it reaches a high temperature. This step simulates the bottle's conditions when filled with hot beverages.
Measure External Temperature: Measure the outer surface temperature of the bottle. If the vacuum insulation is effective, the exterior should remain cool. This test verifies that the vacuum seal works properly and that the insulation functions as intended.
Step 9: Painting the Bottle
Prepare for Coating: Ensure the tumbler is clean and dry. Any residue or moisture can affect the adhesion and finish of the coating.
Apply Coating: Apply the powder coating or spray paint evenly to the bottle's exterior. Use smooth, consistent strokes to avoid drips or uneven coverage.
Cure the Coating: Allow the coating to cure according to the manufacturer's instructions. Curing can involve placing the bottle in a curing oven or air drying it, and is essential for a durable coating.
Step 10: Final Cleaning
Prepare Cleaning Solution: Mix a small amount of mild detergent in a basin or sink with warm water. Ensure the solution is well-mixed and sudsy.
Clean the Interior and Exterior: Dip a soft cloth into the soapy water and thoroughly clean the tumbler's interior and exterior surfaces. Use a brush to clean hard-to-reach areas.
Rinse and Dry: Rinse the tumbler thoroughly with warm water to remove all soap residues. Dry the tumbler with a soft, clean cloth.
Final Inspection: Inspect the tumbler for any remaining dirt or soap residue. If any spots were missed, repeat the cleaning process as necessary to ensure the tumbler is completely clean.
As one of the best professional companies, BORGE has focused on the manufacture of drinkware for 8 years. Our company has rich experience in ODM&OEM orders and a creative design team. Based on our excellent quality and service, our company has long-term partnerships with many famous enterprises and the products spreading all over the world.

FAQ
Find professional vacuum insulated water bottle manufacturers and suppliers in China here! If you're going to buy high quality vacuum insulated water bottle, welcome to get more information from our factory.
750ml Insulated Water Bottle, vacuum insulated water bottle, Large Capacity Hot Water Thermos